When you first start to dabble with macros and VBA, one of the first challenges you will face is fathoming out what to do with the personal macro workbook.
What is the Personal Macro Workbook
The Personal Macro Workbook called personal.xlsb does not exist until you create it and even then it tends to remain hidden from general view. This personal workbook is the best place to store useful macros as it is loaded automatically as excel starts (after you’ve created it for the very first time) and means that the snippets of code and macros that you’ve deemed to be super useful are always available and not reserved for a single workbook which is the case with macros stored in all other workbooks.
Along with macros, you can also store user defined functions in the personal workbook macro so you can expand on those already provided by Excel.
How to create a Personal Macro Workbook for the first time
I create a personal.xls file for the first time by recording the worlds simplest (and most useless) macro.
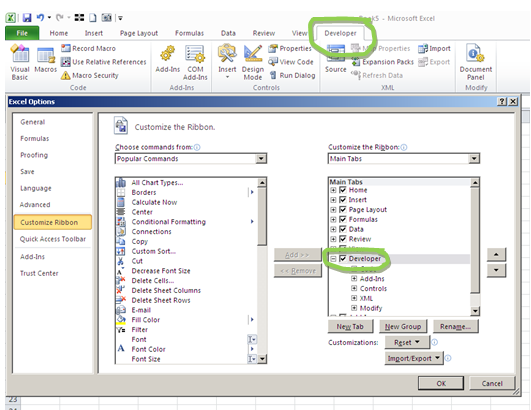
Step 1 – Make sure the developer ribbon has been enabled
- File – Options – Customise Ribbon and tick the option for Developer
Step 2 - Record a macro
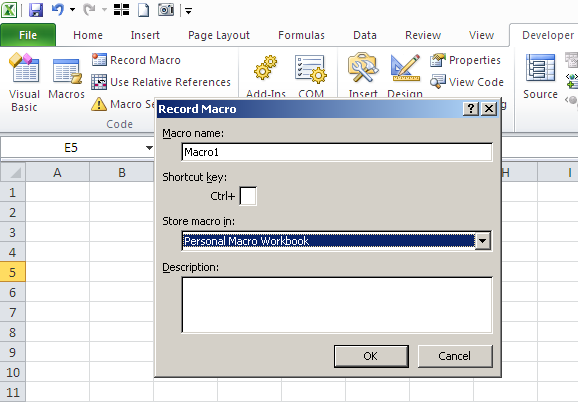
- Open a blank workbook
- Go to the Developer tab and select Record Macro
- In the option box ensure that it is set to store macro in: Personal Macro Workbook – press OK
- The macro is now recording your every Excel based move but we aren’t trying to do anything other than create personal.xls so now you should hit the stop recording button
You’ve now created your personal macro workbook but you will probably need to unhide it in order to edit it.
How to Unhide the Personal Macro Workbook

- Navigate to the View menu on the excel ribbon.
- Click on the Unhide image
- Select PERSONAL and hit OK
You have now opened what appears to be a blank workbook – very dull.
How to Store Useful Macros in the Personal Macro Workbook
In order to put useful macros in your personal macro workbook, you have to open the Visual Basic editor where your code will be stored. You can do this by navigating to the Developer tab on the ribbon and then hitting the Visual Basic icon or you can just tap ALT and F11 to toggle between the editor and excel.
Within the editor you should see something like this, although the number of VBAProjects listed will depend on how many workbooks you have open. If you can’t see the Project window just amend your view by choosing View – Project Explorer and you may as well also open Properties Window using the same method.
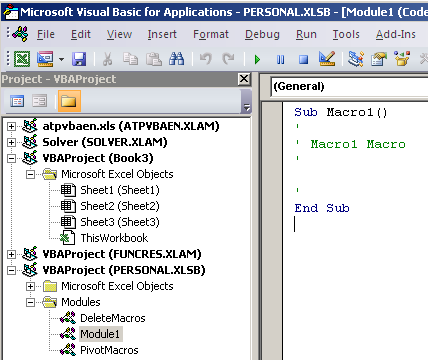
Now go down to VBAProject (Personal.xlsb) and pop open the hierarchy until you reveal the modules. The modules are where the macro code will be saved and you will have one module called Module 1, that was created with our useless macro above. Double click this module to open and you will see this:
Sub Macro1()
'
' Macro1 Macro
'

'
End Sub
As this is the world’s most useless macro we can happily delete or overwrite this code with something far more useful.
What Macros should I put in my Personal Macro Workbook
Your personal workbook is a very personal affair and you should put in here anything that you find useful to your particular workflow.
Here’s a few of my choice examples for deleting blank rows:
DeleteRowOnBlankCell()
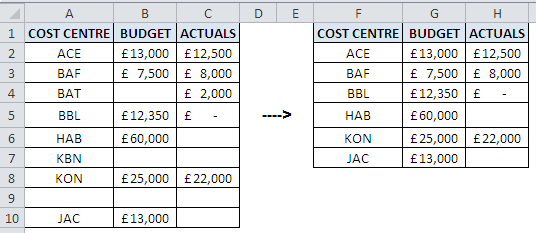
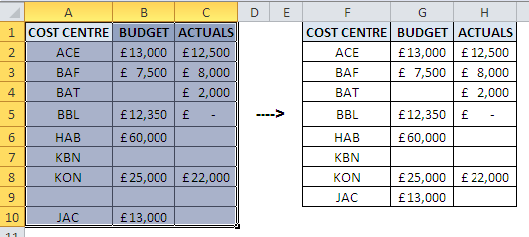
This first macro will delete any row in which the cell in the selected column is blank. So in this example, with column B selected, rows 4,7 & 9 will be deleted. I find this particularly useful for dealing with ledger downloads where I may only be interested in details where actual costs have been incurred, regardless of whether there is a budget or not.
Sub DeleteRowOnBlankCell()

'Deletes entire row within the selected column where cell within the selection is blank
'Select column then run the macro

On Error Resume Next
Selection.SpecialCells(xlBlanks).EntireRow.Delete
On Error GoTo 0

End Sub
DeleteBlankRows()
The second macro will only delete rows if the entire row is blank. Just select the area you want to evaluate and run the macro. So in this example, only row 9 will be deleted and is useful as a clean up macro which doesn’t risk deleting values.
Sub DeleteBlankRows()

'Deletes the entire row within the selection provided the ENTIRE row is blank.
'Select the area for the macro to work on

Dim i As Long
For i = Selection.Rows.Count To 1 Step -1
If WorksheetFunction.CountA(Selection.Rows(i)) = 0 Then
Selection.Rows(i).EntireRow.Delete
End If
Next i

End Sub
When you’ve put a new macro in your personal macro workbook you must remember to save the file. When you close Excel it will ask you if you want to save changes to your personal macro workbook.
I’d be really interested to hear what macros you choose to store in your personal workbook.
Updates
Macro to wrap IFERROR()
I love this macro. It wraps the error capture function around pre-existing formulas. I’ve prepared a post just for this wrap IFERROR() function alone.
Sub WrapIfError()

'PURPOSE: Add an IFERROR() Function around all the selected cells' formulas
'SOURCE: www.TheSpreadsheetGuru.com

Dim rng As Range
Dim cell As Range
Dim x As String

'Determine if a single cell or range is selected
  If Selection.Cells.Count = 1 Then
    Set rng = Selection
    If Not rng.HasFormula Then GoTo NoFormulas
  Else
    'Get Range of Cells that Only Contain Formulas
      On Error GoTo NoFormulas
        Set rng = Selection.SpecialCells(xlCellTypeFormulas)
      On Error GoTo 0
  End If

'Loop Through Each Cell in Range and add =IFERROR(\[formula\],"")
  For Each cell In rng.Cells
    x = cell.Formula
    cell = "=IFERROR(" & Right(x, Len(x) - 1) & "," & Chr(34) & Chr(34) & ")"
  Next cell

Exit Sub

'Error Handler
NoFormulas:
  MsgBox "There were no formulas found in your selection!"

End Sub
Macro to Set all Pivot Fields to Sum
If the data you are pivoting contains only numeric data then Excel will sum the data. If there are any blank cells or text cells (other than the header), then Excel will count the data. If you want to quickly set all the pivot fields to Sum then use this macro.
For more options, check out this detailed post on Pivot Macros.
Public Sub PivotFieldsToSum()
' Cycles through all pivot data fields and sets to sum
' Created by Dr Moxie

Dim pf As PivotField
With Selection.PivotTable
.ManualUpdate = True
For Each pf In .DataFields
With pf
.Function = xlSum
.NumberFormat = "#,##0;\[Red\](#,##0)"

End With
Next pf
.ManualUpdate = False
End With
End Sub
Macro to flatten pivot table and repeat item labels
This is particularly useful if you plan to use a pivot table to generate data for further analysis. In that case you want a flat file with all the field details repeated. See this post which provides examples of why you would want to repeat item labels and flatten a pivot table.
Sub PivotFieldsRepeat()

'Created by Dr Moxie from code assembled from the web
'Great tips from Contextures:
'http://blog.contextures.com/archives/2015/02/12/hide-pivot-table-subtotals/

'The macros sets the pivot into classic mode, repeats all labels and removes subtotals
'Setting you up to copy and paste the pivot table as a flat file data source if required

    Dim pt As PivotTable
    Dim pf As PivotField

    On Error Resume Next
        Set pt = ActiveCell.PivotTable
    On Error GoTo 0

    If Not pt Is Nothing Then

    'sets the pivot table into classic format
        With pt
            .InGridDropZones = True
            .RowAxisLayout xlTabularRow
        End With

        For Each pf In pt.PivotFields
            If pf.Orientation = xlRowField Then

            'This option sets all subtotal options (Sum, Count, Avg etc) to false
                'pf.Subtotals = Array(False, False, False, False, False, False, False, False, False, False, False, False)

            'My preferred option is to set the automatic so that only one subtotal option s selected
            'Then turn automatic subtotals off
                pf.Subtotals(1) = True
                pf.Subtotals(1) = False

            'This section then repeats the item labels
                pf.RepeatLabels = True
            End If
        Next pf
    End If

End Sub
Macro to convert a Pivot Table back to the Modern Style
If you’ve used the previous macro which converts the pivot table to the classic style, you may wish to go back to the modern, outlined version at some point.
Sub ReturnToModernPivotStyle()
 Dim pt As PivotTable
    Dim pf As PivotField

    On Error Resume Next
        Set pt = ActiveCell.PivotTable
    On Error GoTo 0

    If Not pt Is Nothing Then

    'sets the pivot table into the modern style

    With pt
        .InGridDropZones = False
        .RowAxisLayout xlCompactRow
        .TableStyle2 = "PivotStyleLight17"
        .DisplayContextTooltips = True
        .ShowDrillIndicators = True
    End With

    For Each pf In pt.PivotFields
            If pf.Orientation = xlRowField Then


            'Turn automatic subtotals back on
                pf.Subtotals(1) = True


            'This section then removes the repeating item labels
                pf.RepeatLabels = False
            End If
        Next pf
    End If

End Sub
I’ve created a workbook with copies of all these macros (and more). In order to use as intended you should copy each macro to a module withing your personal workbook. Follow the instructions from the beginning of this post if you are confused by this.
Click to download the Personal Workbook macro Ideas workbook, it is saved as a zip file so you will need to unzip to use.